I Love Crafting!
Scroll down this page to see fun crafting ideas !
FELT ORNAMENTS
I made these patterns from well known masterworks and then made ornaments out of felt. I traced photos from my tablet and then used embellishments to make them pop on the tree. Most of the ornaments are around 2 x 3 or 4-ish. Any smaller and it is difficult to bring out detail. Anything larger and they are too big for a tree. I had so much fun interoperating the paintings into ornaments. All you need is tracing paper, needle and thread, a computer and some imagination. I started out with your basic simple felt ornaments from kits and then graduated to these.
MY NEW OBSESSION
SOAP MAKING!
O.K. so I have only been soaping for 6 months
Anyone can do this! as an artist it appeals to my creative side. If you like to cook then it will feel a lot like making a great recipe. If you are a science-y kind of person, which I am not, it will appeal to the analytical mind. Only problem is that if you really get into this you better have a big family,( I don't) or plan on starting a business (I am) because a person can only have so much soap.
O.K. so I have only been soaping for 1 month and three weeks and it all started with that stupid little castile soap recipe and my next soap was an advanced soap (pumpkin pie) and yes, it turned out great. Soap making, no sweat so now 7 weeks and 63 soaps later I am totally all in. Well I have to be 'cause I have several hundred bars of soap and spoiler alert everyone knows what they are getting for Christmas and I have to wait at least 3 more months to see if any of them are any good but they look good so I have hope.
Now I have a soap journal and I keep track of my batch dates and what the batter is like and I think I am coming up with some "master batch" soaps that will be my staple supply. The freezer is full of flat beer, boiled wine , and fruit and veggie purees. The ice cube trays are full of goats milk and my husband is afraid to through a cream or milk carton away (soap molds). I think the UPS guy thinks I have started a meth lab with all the deliveries I get from the "Chemistry Lab" company. I think he will be the first one I give some soap to.
The upstairs bathroom is becoming my soap making room and the laundry room is sharing space with my drying racks. Oh, and we will never have a clogged drain again with all the residue lye that's going down the drain (perk). So ask me in about 3 months if I think this is all worth it. I can tell you it's fun and challenging and creative. I can tell you it's a better alternative than store bought soaps. I can definitely say that no one turns down homemade soaps!
I have decided not to turn into one of those "soap people". Let's just say people can take soap waaaay to seriously. I am determined to keep my sense of humour and not put the fear of God into people about the dangers of evil lye and how you will burn your eyeballs out if you don't wear goggles; actually wear goggles (just sayin). Yes I wear protection and yet I have had a lye crystal or 2 burn me and I am still here! and although I have found much useful information on soap forum sites- soap people kinda' scare me a little. Actually forum people are not as scary as the FDA, but close.
On a serious note if my ramblings make you want to do soaping, do your research before you start! I think I have literally read everything there is on the web. Soap Queen basic instruction will get you started off right and then- the skies the limit.
10 Things you may not know about soap-
1. It takes 4 months to a year for soap to cure.
2. The name soap comes from the process of saponification that makes fat turn to soap.
3. All soaps have lye in them. (lye is just water run through fireplace ash.) But lye dissipates during saponification.
4. Any fat can be turned into soap.
5. The term for a ready batch of batter to make soap is called, "trace"
6. Cold Process, Hot process, & Melt and Pour are the three ways to make soap.
7. Store brand soaps have detergents in them to speed up curing time and add bubbles (yuck).
8. Most scents in soaps will only last for 1 or 2 months but scenting soap sells. Store brand soaps scents will last longer but then again they use chemicals to help longevity (yuck again)
9.From start to finish it takes about 1 hour to make a batch of soap, so not a huge investment of time.
10. If you want to make soap with children please use melt and pour soap bases. They are soaps that have already gone through saponification so are safe around children.
The politics of soap-
If I tell you my soap moisturizes then I am under the cosmetics (FDA) rules and regulations and need to follow the 10,000 pages of confusing and contradictory regulations and statutes.
If I tell you my soap is good for acne then I am under the drugs (FDA) rules and regulations and need a pharmaceutical license.
If I tell you my soap cleanses then I am under the Fair Trade commission's purview, which wants to make sure my labeling is correct and my facility is clean.
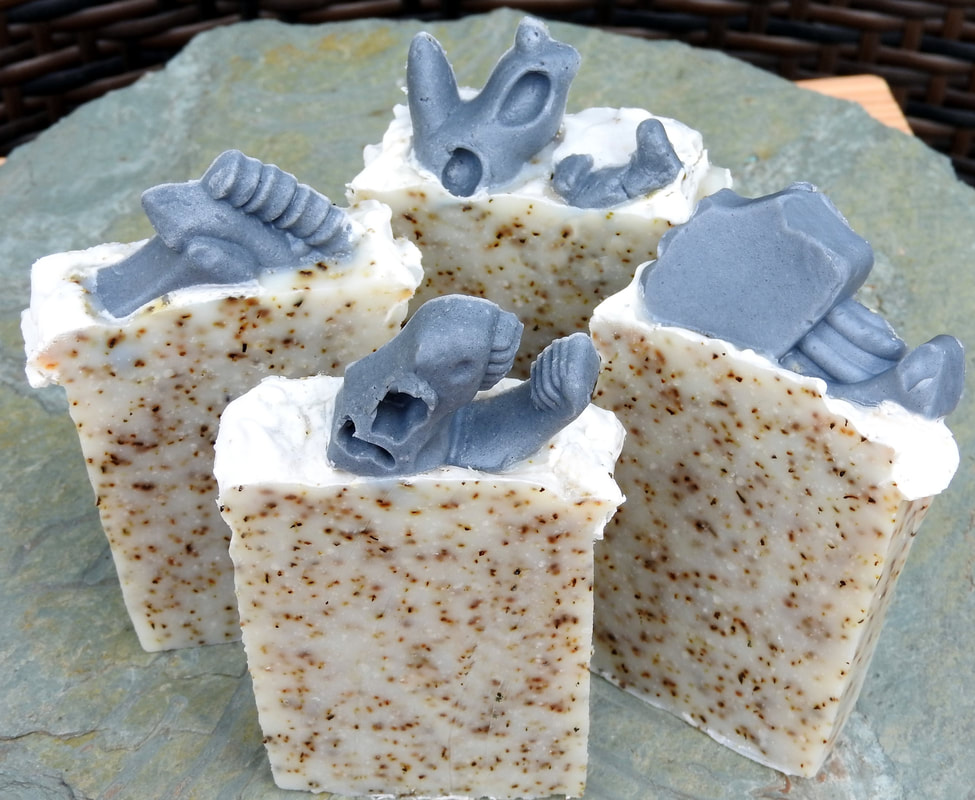
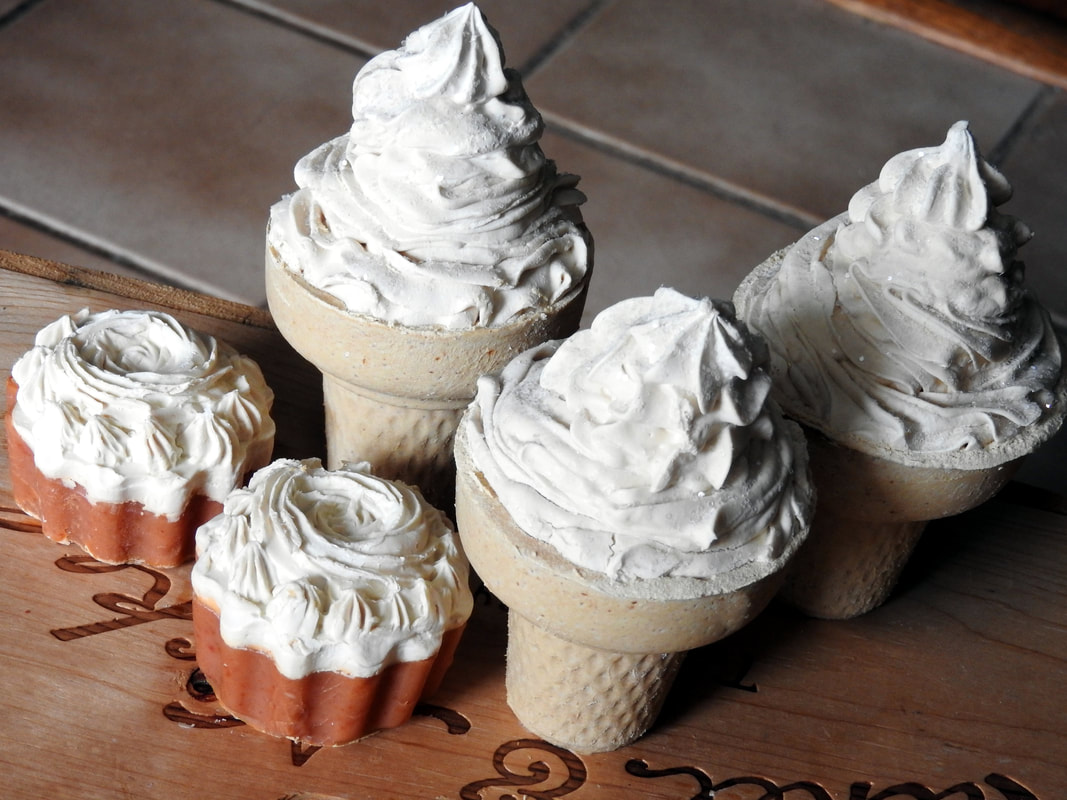
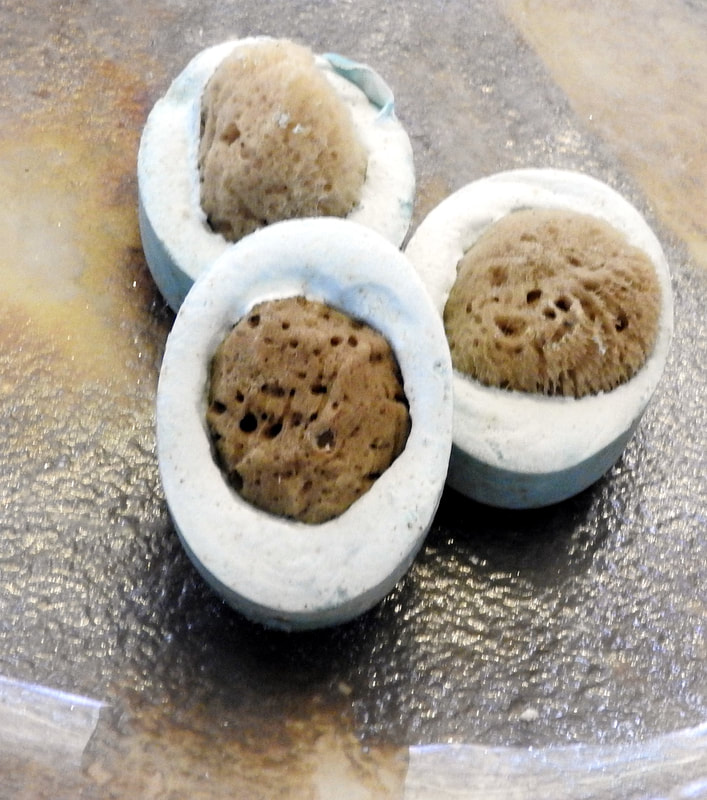
SOME OF MY EARLIEST SOAPS
It ain't all pretty...
My beginner supply list
2 lb silicone loaf mold
silicone slab mold
silicone cupcake mold
soap loaf cutter with blades and planer
set of plastic spoons
spatula
chopstick
plastic teaspoon
thick plastic chopping board
toothbrush
long plastic gloves
googles
paper ventilation mask
64 oz. high heat plastic bucket
assorted plastic buckets
4 pour spout containers
digital scale
stick bender
laser thermometer
drying racks (I use cheap stacking plastic veggie bins and pie racks)
3 or 4 bath towels(to cover your soaps to keep them warm)
a box (for laying your molds in to keep them warm)
sodium hydroxide(lye)
distilled water
(and lots and lots of oils and essential oils and fragrance oils and micas and oxides and additives like oatmeal and tea leaves !)
and never throw away a Pringles can or paper milk carton.
2 of the best sites for soap instruction and recipes

I Love Hot Glue Guns!
Welcome to my Crafty world
I am a master scrapbooker who owned a scrapbook store for 11 years. Have a degree in fashion design and was a head clothing designer for several stores. I design my own needlepoint canvases and have a Masters in Fine Arts ( I made extra money at school by painting murals). I also managed a folk art gallery and produced a children's catalog filled with artisan gifts by local artists. Add all of this to my very active scouting, church, and school life and well you have a crazy crafter. From jewelry making to paper airplanes I have attempted it all ( some not so successfully.) Please contact me on the comment section at the bottom of the page if you need help or are looking for some new crafting ideas. If I don't have the answer, I'll find one for you!
Paper Birds
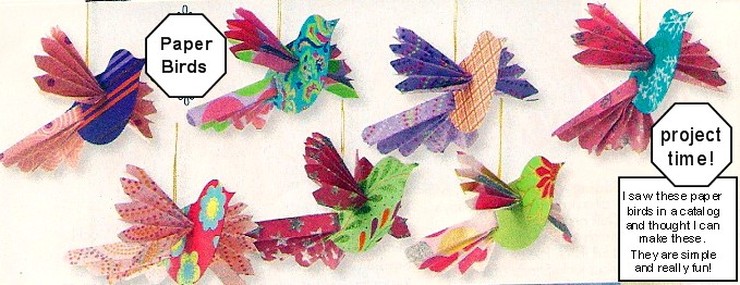
Step one- Cut out the shape of a bird on two-sided cardstock about 8" long and 5" high. Make sure it is only the shape of the birds body minus a tail.
Step two- As shown on the photo, cut a horizontal slit in the body about 1 1/2" long by 1/8" high for the wings to go through and a vertical slit by the tail the same dimensions as the wing slit.
Step three- Cut a two sided 12 x 12 paper in half. Accordian fold both pieces longwise, making sure that it is folded so that the pieces will fit through the slits.
Step four- Fold one of the accordian folded pieces in half and then pull through the slit in the tail. Fold the tail piece in half and staple the inside edge of the tail together to secure. Fan the paper slightly to make it look like a tail. Hold the tail together and trim off the end at the corners to make the tail fluted.
Step five- Hold together the other accordian piece (unfolded) and trim both ends to flute. Slide the piece threw the wing slit halfway and fan the wings out on both sides.
Step six- Add an embellishment for the eyes.
Step seven- punch a hole to hang your bird up. I used a eyelet so that the string wouldn't cut through the paper.
If you use cardstock for the tail and wings you may need to reinforce the body of the bird by making it double thick or the body can be made of chipboard covered with paper. Make these in miniture for Christmas ornaments.
You can see a video of this project on my facebook page (Lisa Myers)
Make a purse from recycled items in one day!
Purse supplies and instructions-
This purse took me two days because of drying time but it could be made in one day.
supplies-
one paper mache purse blank ( I get mine from Amazon)
1 bottle of liquid acrylic paint, your choice of color
1 bottle of spray walnut ink
1 lg. tube of any strong all purpose adhesive i.e. ShoeGlue (not shown in photo, oops)
1 stiff blunt edged brush for painting and decoupaging
paper strips cut from old catalogs or sunday supplement
2 sheets of felt
scissors
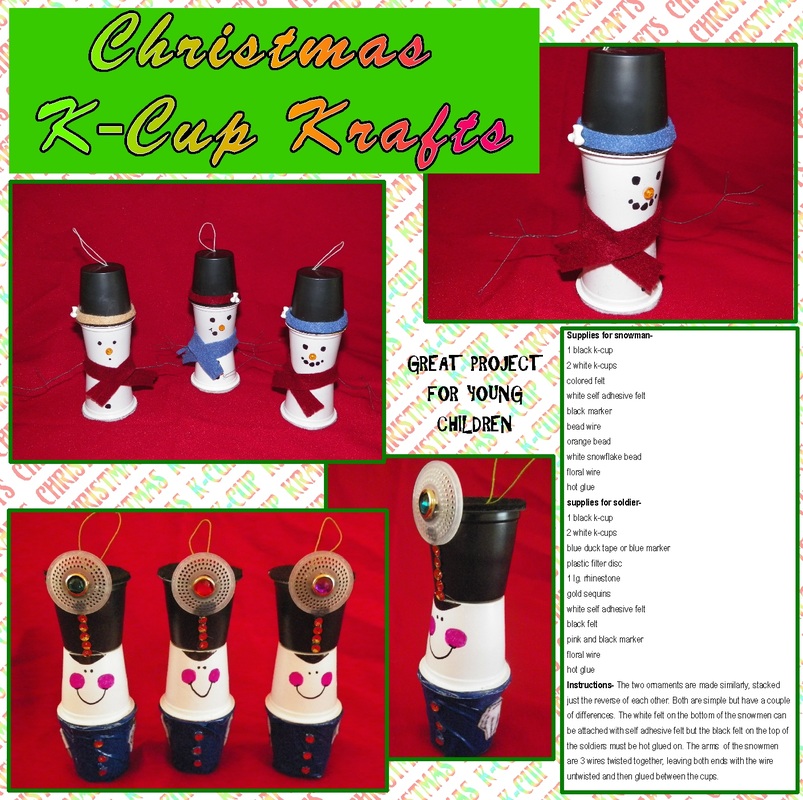
assorted k-cup lids and decorative brads for each cup top.
a jar decoupage like Mod Podge
directions-
1. Paint the outside of the purse only, let dry. This may take 2 coats depending on the color.
2. Cut paper into 1/4" wide strips, then cut them approx. 5" long. You will need 8 strips per flower. How many strips you will need will be determined by how many flowers you put on the purse.
3.After the paint is thoroughly dry, decoupage the petals onto the purse. I start out with a cross and then add each petal to form pie slices. This will ensure a fairly consistant circle shape.
4.When flowers are dry spray box with walnut spray. You will need to spread out some wax paper and then open the purse and lay it outside up and spray random spritzes. Hold the spray at least a foot away. Ink will dry lighter than it appears when wet. Do not spray evenly on the surface. The pattern should be lighter in some areas and heavier in others. Let dry.
5. Decoupage several layers over the entire outside of the purse, avoiding the mettle findings. Let dry completely between coats.
6. When purse is completely dry, cut and glue, using the multipurpose glue, the felt to the inside of the purse. Remember not to glue the felt to the very edge of the lid or the purse will not close.
7. Cut the lids off of the k-cups using your scissors. There will be a little plastic rim under the lid but that is fine. It will add demension to the purse.
8.Add the decorative brads to the center of the lids where the hole is.
9.Using the strong multipupose glue adhere the lids onto the center of the flowers. Use the glue liberally. You may have to hold down the centers to make them stick, especially if you bend them around the edges. I snipped the edge of the lids when I needed to bend them and they layed flatter.
supplies-
one paper mache purse blank ( I get mine from Amazon)
1 bottle of liquid acrylic paint, your choice of color
1 bottle of spray walnut ink
1 lg. tube of any strong all purpose adhesive i.e. ShoeGlue (not shown in photo, oops)
1 stiff blunt edged brush for painting and decoupaging
paper strips cut from old catalogs or sunday supplement
2 sheets of felt
scissors
assorted k-cup lids and decorative brads for each cup top.
a jar decoupage like Mod Podge
directions-
1. Paint the outside of the purse only, let dry. This may take 2 coats depending on the color.
2. Cut paper into 1/4" wide strips, then cut them approx. 5" long. You will need 8 strips per flower. How many strips you will need will be determined by how many flowers you put on the purse.
3.After the paint is thoroughly dry, decoupage the petals onto the purse. I start out with a cross and then add each petal to form pie slices. This will ensure a fairly consistant circle shape.
4.When flowers are dry spray box with walnut spray. You will need to spread out some wax paper and then open the purse and lay it outside up and spray random spritzes. Hold the spray at least a foot away. Ink will dry lighter than it appears when wet. Do not spray evenly on the surface. The pattern should be lighter in some areas and heavier in others. Let dry.
5. Decoupage several layers over the entire outside of the purse, avoiding the mettle findings. Let dry completely between coats.
6. When purse is completely dry, cut and glue, using the multipurpose glue, the felt to the inside of the purse. Remember not to glue the felt to the very edge of the lid or the purse will not close.
7. Cut the lids off of the k-cups using your scissors. There will be a little plastic rim under the lid but that is fine. It will add demension to the purse.
8.Add the decorative brads to the center of the lids where the hole is.
9.Using the strong multipupose glue adhere the lids onto the center of the flowers. Use the glue liberally. You may have to hold down the centers to make them stick, especially if you bend them around the edges. I snipped the edge of the lids when I needed to bend them and they layed flatter.
My wooden cigar box purses
OK, these were alot more difficult than I anticipated. Expect to pay 50-80 dollars per box in supplies. I made many of the findings and used recycled items and still spent around 45$ a purse. I think they turned out well for my first attempt. These are to fragile for everyday purses, very definately special occasion. That's not to say they aren't well made just not put together for everyday use.
Instructions and supplies:
It would be difficult to tell you supplies as I used many odds and ends. The supply list below is only a general attempt to tell you what you need. You may want to substitute items to make it your own-
1. wooden or cardboard cigar box
2. doll armiture wire for the handles. Get as strong a wire as will fit through handle bead holes. I also made some purses with purse chains.
3. assorted glass beads for handle (you may aquire readymade handles but they will be quite pricey)
4. polyeurythane (do not use decoupage as it will never dry hard enough) to seal outside of purses
5.decorative upholstry tacks for purse feet (again you can buy purse feet as well)
6. assorted purse closures (my boxes were different sizes and different closures worked differently depending on the box, you will need to experiment)
7. felt for purse linings (approx. 1 8X10 sheet per purse) You can also use fabric but it shows seems easier)
8. assorted charms
9. assorted jewelry toggle closures and fish hook closures (I used 2 each of the toggles and 2 of the fish hook closures to attach the handles to the purses)
10.If you are using cardboard cigar boxes you may want to reinforce the lid with a couple of hinges (I didn't do this on my purses)
11.acrylic paint in colors of your choosing
12.1/4 to 1/8 inch Grograin ribbon in co-ordinating colors (1 standard spool can usually do 3 purses)
13.You may need a 1 inch ribbon to attach a purse closure as with my Pirate purse.
14.1/2 inch grograin ribbon to trim interior lining of purse (this will keep the felt from coming up in the purse)
15. strong bond clear adhesive
16. hammer
17. needle nose plyers
18. drill with small bit
19. fabric scissors
20. assorted decals and ephemera to decorate box (I used images from catalogs)
21. chain for charms
As far as decoration goes it is up to you. Some people completely cover the purses or remove the cigar decals. Mine are simple because I thought the cigar labels were cool. I have seen some loaded with charms and sequins. It is really up to you. You can buy cigar box style purses that are easier to work with because they are designed for the findings to fit properly but I find the real thing so much more fun. It becomes kind of like a treasure hunt to find them and even better if like me you get them for free.
Step one- make a handle- I used assorted glass beads that I had and some that I found on sale. The handle can be any length but it is important that the wire fits in the holes so buy the beads first and then find the right guage wire that will fit. I simply twist the wire at each end to form a small loop that I can attach the lobster claw closure to. You will only be using the claw ends. Slide the claw ends on before you twist the ends of the wire closed, and set aside. Add a desired length of chain to a charm and attach to the lobster claw.
step two- Line the felt in the bottom half of the box leaving enough room around the top edge for the box to close. I lay the bottom down first and the cut a strip ( or two) that will fit around the inside edge. Felt is great because the seems just don't show. Make sure the felt is glued down liberally or it will peel up. Finish the edge with ribbon.
step three- nail in the upholstry tac feet to the bottom of the box. You may need to trim down the point of the tac with your needlenose plyers so that the tac does not go through the box. (for added security add a dab of glue underneath the tac before you attach it.) Then add the closure according to the style you have chosen. You can refer to my photos to see how I did this.
step four- Paint your box on the outside only your desired color. This will probably take 2 coats.
step five-polyeurathane the outside of the boxes. Three coats at least, drying between each coat, this may take awhile because of drying time. Make sure you cover all the labels on the box. It is OK to get laquer on the feet but paint around closure right up to the edges.
step six-mark the desired location where your handle will attach to the top of the box and drill holes (be careful with the felt inside. It can get twisted by the drill. I drilled until I saw it move the felt and then I sniped a whole in the felt. The hole should be large enough that the loop on the toggle clasp will fit into the whole with room to spare.
step seven- Here comes the cool part that I thought up all by myself:
Take a length of the narrow ribbon that will allow you plenty of room to tie a large bow ( see purses) Thread the ribbon through the eye of the bar end of the toggle closure. From the inside of the purse string the ribbon through the hole and pull through until the bar is flush against the box. This also helps hold the felt down. Then string the eye from the loop end of the toggle through one end of the ribbon and tie it down with a not. Connect the lobster claw to each loop and oila! a working handle. Tie the remaining ribbon into a big bow. I just love the way this looks and it is so simple.
step eight- add embellishments and then cover them with another couple of coats of polyeurathane.
You can also use purse chains on the purse. you will still need the lobster claws to attach it to the purse if you plan on hanging a charm on like I did. if not then the chains can be attached to the ribbon instead of the loop end of the toggle.
Rubber ducky, you're so fine.....
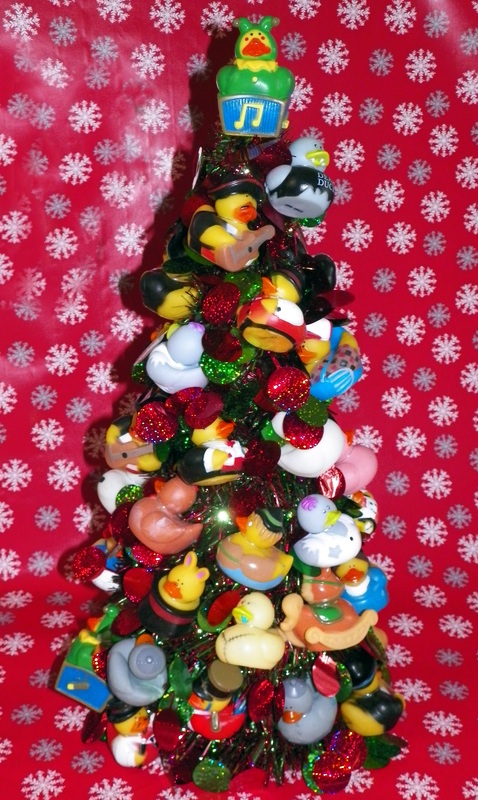
a one hour project (or less)
My daughter has a rubber ducky theme in her bathroom so what could be better than a ducky tree for Christmas. This is so easy and inexpensive you will find yourself making little theme trees all over the place. This would be a great Christmas baby gift too!
supplies-
A 1 1/2 to 2 ft. tree frame and garland ( I got my tree with the garland already on at discount store for $6.00) make sure that the tree form is some sort of wire or plastic mesh. A solid form will not work.
1 spool of very fine wire
36-48 rubber duckies (Oriental Trading has inexpensive duckies on-line in bulk. I bought clearance duckies!)
small string of lights-optional
directions-
1. Wrap the garland (and lights) around the frame and secure with wire.
2. Cut a long enough piece of wire to wrap around the ducks neck and enough left to twist into the tree frame. Repeat until all the duckies are attached. Reach underneath the tree to twist and secure wire to tree.
3. Told you it was easy.
I hang my easter collection on an egg tree.
The Nativity started out as ornaments and well, you see what happened.
|
|
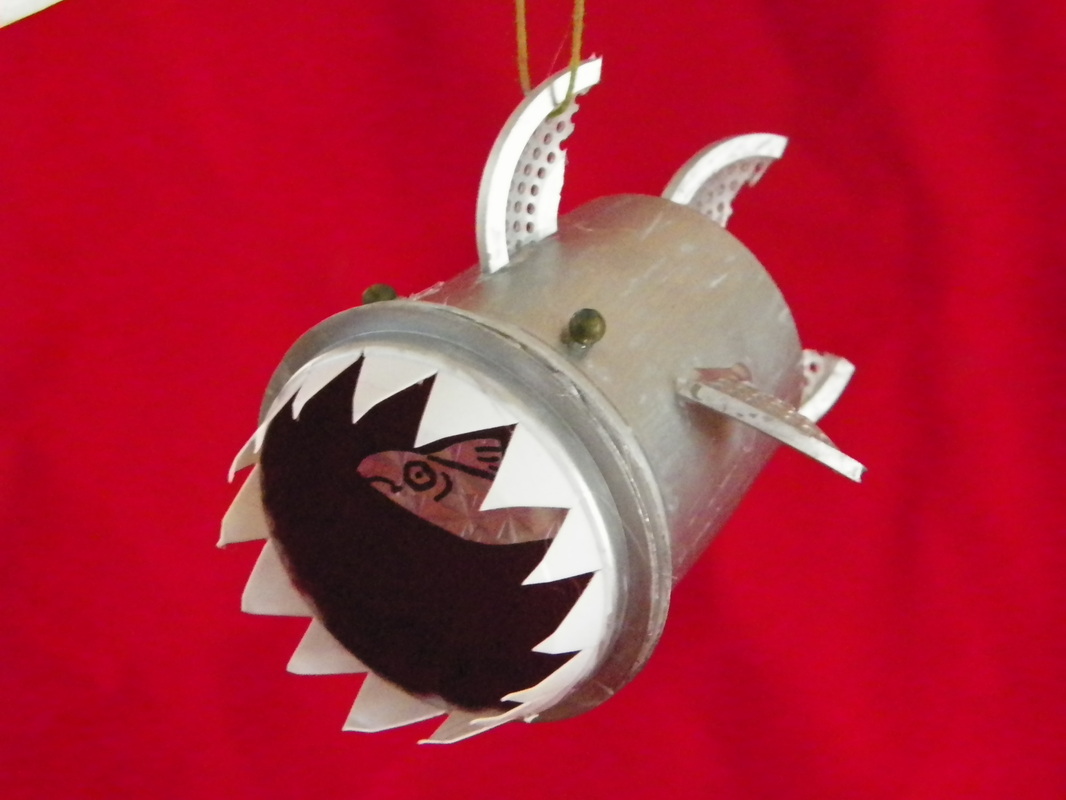
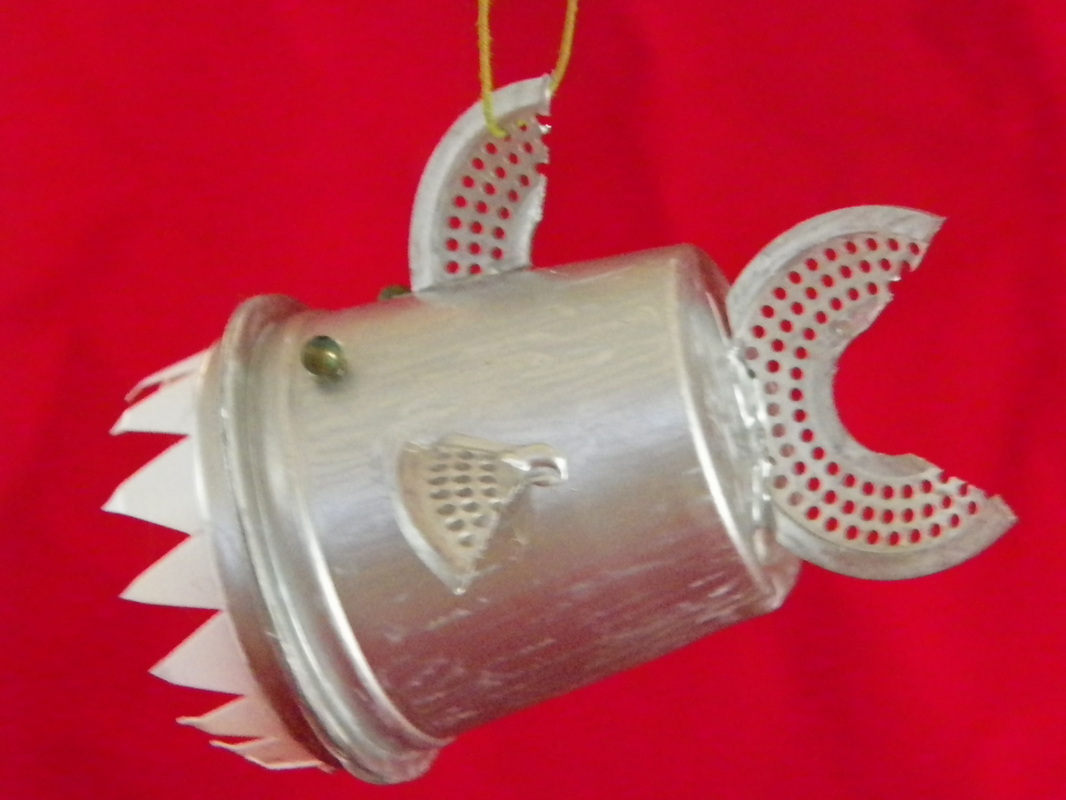
Shark supplies-
2 k-cups 2 small beads 2 plastic filter discs maroon felt slef adhesive halographic paper silver and black marker hot glue floral wire |
instructions-
1. Cut 1 disc into 4ths and cut a slice out of the other disc. Attach like photo. 2. Glue maroon felt disc to end of cup and add teeth. Teeth are made from the largest king crown. 3. Color and cut out fish to add to mouth. Attach wire & eyes. |